Flint and Steel Strikers, the way I make them
Created: December 28, 2023
French Creek Valley Home
Back to Blacksmithing
Guild of Metalsmiths
Striker Materials
Contact Us
Striker Making Process, The Way I Make Them
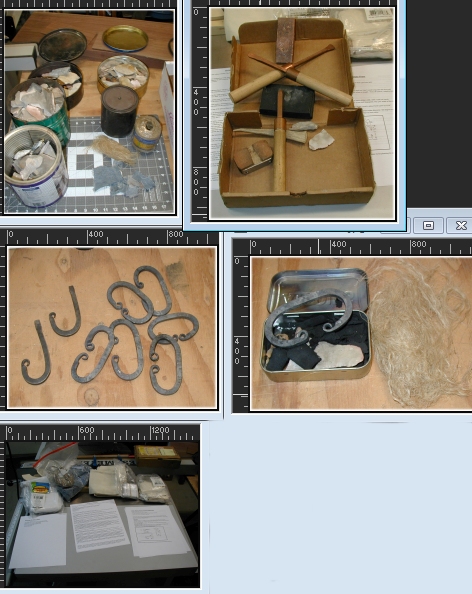
Here are some pictures of the flint and steel fire making equipment and documents that I have in my shop at this time:
Striker stock for the kind of Strikers I make for demos:
I use 3/16 X 1/4 inch X 3 foot bars of W1 tool steel that I get from MSC
I think i use 6 1/2" or 7" of stock for each one.
I usually start with at least 18 inches of the W1 stock so i don't need tongs (for the first end) until each 3 foot bar
has gotten down to about a foot in length.
Then, of course, I need to hold those short pieces with tongs right away.
Fabrication:
- Mark the 6 1/2" to 7" length at the start of each striker, cold, with a cold cut hardy.
-Shoulder off about 1/4" and taper to about a one inch long point. The 3/16" width of the bar is UP for this process step.
-Turn a tiny scroll with scroll pliers. The OD of this scroll is about 1/4" (same as the 1/4" dimension of the bar).
-Turn the end of the bar with the scroll to about a 1 inch inside diameter, 180 degree loop.
-Heat the bar at the cut mark and cut the part off of bar w/ hot cutter.
-Make the loop on the other end as described above.

Reheat and make any final adjustments to get the shape to be pleasing to your eye.
Heat Treatment:
Remove the forging stresses:
-Heat striker to glowing and then allow the striker to Normalize in the unblown fire for a few minutes.
-Remove the striker from the fire and let it air cool in still air for at least 5 minutes.
I usually lay the newly formed striker right on the forge fuel a few inches away from the fire to further slow the cooling process.
Hardening the striking edge:
-While holding one arm of striker with tongs, lower the working edge of the striker into the fire.
-Gently heat to non-magnetic or medium red heat.
-Immediately quench only the working edge, in water, swishing it around to speed cooling.
(Don't allow the "arms" to get into the water until they lose ALL color)
Removing decarburization from the striking edge:
-Test for file hardness. file should skate on working edge.
-Lightly grind several thousandths of an inch off of working edge.
-Test it again. If it doesn't seem to spark as well as expected, grind off a bit more material from the striking surface.
Notes about the stones that I use:
Just about any kind of hard rock will work, as long as a sharp edge can be knapped or broken from it.
Limestone like the kind that is found in driveways is an example of a NOT hard rock.
Pressure Flaking is used to re-sharpen a piece of flint, quartz (or any hard stone) that had previously been used for fire making,
but whose sharp edges had been dulled by constant or inappropriate use.
I don't do any real "flint knapping", except for occasional pressure flaking, usually just to demonstrate the technique.
I do have a small set of knapping tools, but other than just the pressure flaking mentioned above,
I just don't understand how to "read the rock" when attempting any of the other flint knapping processes.